 |
|||
|
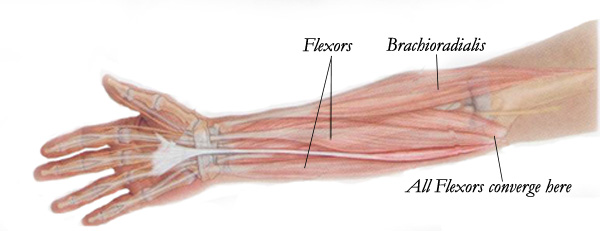
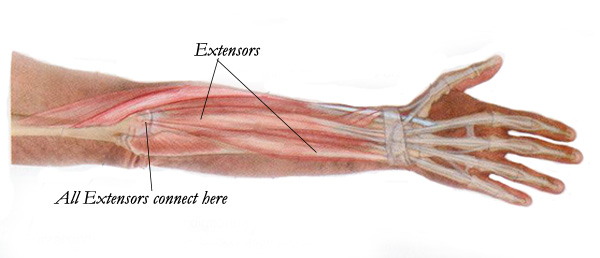
Should we decide to work together, there is a good chance I will send you home with stretches and exercises in order to maintain the relief gained in the massage session. It is very important to be aware of the plane (or angle) of each stretch in order to gain full benefit without injury. A stretch done hastily and/or out of proper alignment can create pain instead of relief. Here are a few examples for stretching major muscle groups/areas. I hope to have short videos published soon to demostrate these moves beyond words. WRIST OR FOREARM PAINincluding CARPAL TUNNEL, GOLFERS ELBOW, TENNIS ELBOWThere are 5 simple steps to relief from wrist and forearm pain:
1) FLEXORS: Press and Stretch the belly (underside) of the forearm. Stretch with palm facing up, pressing on soft underbelly of forearm. Make a 'soft fist' (thumb lightly tucked inside fingers) and bend fist down towards floor. Repeat 'press and stretch' several times changing the spot you are pressing on the forearm.
2) EXTENSORS: Press and Stretch the top of the forearm. Stretch with palm facing down, pressing on top (or hairy) part of forearm. Make a 'soft fist' (thumb lightly tucked inside fingers) and bend fist towards floor. Repeat 'press and stretch' several times changing the spot you are pressing. 3) BRACHIORADIALIS: Press and Stretch the Brachioradialus muscle while twisting 'soft fist' left to right. The hand position is palm facing the other hand and the thumb faces the sky. This muscle is located on top of forearm from the elbow til about half way to the wrist. It will bulge under your hand if you squeeze a fist tight. Repeat 'press and stretch' several times changing the spot you are pressing and the plane (or angle) of the stretch. Stretch with palm facing down, pressing on top (or hairy) part of forearm. Make a 'soft fist' (thumb lightly tucked inside fingers) and bend fist towards floor. 4) ELBOW: Hold both sides of elbow just above bony joint with elbow bent. Rotate elbow in a circular manner several times each way while holding firm pressure above the joint. 5) FINGERS: Wiggle fingers while holding sides (not top and bottom) of large joint located in the middle of each finger. Wiggle several times with firm pressure on joint. Repeat for each of the 10 fingers.
NECK AND SHOULDER PAIN:1) Sit or stand up straight with head balanced softly directly over the neck. Turn head 45 degrees so that the nose lies above the nipple line. Stretch the neck moving towards the chest leading with the nose towards the nipple. Repeat several times on one side before moving to other side. This is most effective done regularly in a hot shower. 2) Stretch the neck to one side moving ear to shoulder. Move slowly and deliberately holding the stretch no more than 2 seconds. Repeat several times one way before moving to the other side. You may use your hand to intensify the stretch by pulling the ear closer to the shoulder, making sure the nose stays facing front throughout the stretch. Do not use hand intensification until you are warmed up by doing several repetitions without first. 3) Neck rolls. Once steps 1 and 2 have warmed up the neck, you may comfortably perform neck rolls. Begin with head balanced softly upon the neck. Gently allow head to fall forward to chest. Roll head first by moving ear to shoulder, back of head to back, ear to other shoulder, then chin back to chest. Repeat several times in one direction then proceed to other direction. Be sure to repeat even amount of stretches on each side.
LOW BACK PAIN:1) Lie on back upon a comfortable surface. Bend knees and place left knee over right as in a cross-legged position. Place hands beneath head. Slowly let right knee fall to the right stretching the left hip and lower back. Allow the body to determine the degree of stretch never forcing stretch nor causing pain. Stop at the range that causes any discomfort, breathe and relax. You may attempt to stretch further once relaxed if there is no discomfort. Hold max stretch for several seconds. Repeat on opposite side. 2) Place left leg over right resting foot outside the right knee. Place right hand upon left knee and gently urge knee to the floor. Bring knee across the body to facilitate a good stretch; seek to challenge the muscle rather than aggravate. Hold the deep stretch for 2 seconds, return to 'neutral' by returning leg to starting position. Repeat this several times on one side noticing any gained range. Proceed to other side always allowing enough time to administer the same amount of repetitions to each side. 3) For the more adventurous: Lie on your side, very close to the edge of a bed with bottom facing outwards. Place top arm overhead and bend lower knee while straightening the top leg (you may need to hold on to balance yourself depending on the softness of the bed surface). Allow the top leg to fall off the edge of the bed stretching towards the floor. Hold the deepest stretch (without pain) for no more than 2 seconds. 'Pump' the leg back up to hip height and then actively stretch the foot again to the floor. Repeat several times before moving to other side of bed to work opposite side. Be sure your hips are stacked on top of each other in a straight line when you start, notice if the body is falling forward or backward and correct. This stretch is a wonderful tool to access the all important Quadratud Lumborum muscle in the lower back. 4) Stand with feet hip distance apart with hands gently resting on hips. Turn entire torso to the left so the nose is in line with the nipple. Gently stretch forward leading with the nose and keeping the hips stationary and facing forward. Stretch the lower back into a deep stretch without pain. Repeat several times on one side noticing any gain in range then repeat same repetitions on opposite side. 5) Torso rolls. Stand with feet hip distance apart and hands gently resting on hips. Lean forward with entire torso including the head about 30 degrees, or as far as is comfortable. Keeping hips stationary, move in a circular motion focusing on the feel of the stretch in the lower back. Generate movement from the low torso or belly button area, gauge size of circle upon feel in the low back. Stretch so that tight areas are soothed by the motion. Repeat opposite direction. 6) Lie on back, bend knees and place hands upon the same side knee. Gently roll upon the lower back by making small circles with the knees. Imagine your knees drawing circles in the air. Repeat several times in each direction varying size of circle feeling gentle comforting pressure on the low back and buttocks. Repeat opposite side. FLYERS:PDF flyers on stretches for Carpal Tunnel : CLICK HERE |
|||
 |
|||
 |
|||
 |
|||
 |
|||
 |
|||
 |
|||
 |
|||
 |
|||
 |
|||